This is the first article in a new series about PX-CSI, the Everpure (formerly Pure Storage) CSI driver for Kubernetes. Over the next few articles, we’ll go from provisioning and volume lifecycle management to high availability and advanced use cases like KubeVirt — each one illustrated with a hands-on demo video.
Introduction
If you’ve followed my previous series on Vates XCP-NG, you’ve seen how Everpure integrates with virtualization platforms at the hypervisor layer. This new series moves up the stack, into Kubernetes — and specifically into how stateful, containerized applications get access to enterprise-grade persistent storage.
The tool that makes this possible is PX-CSI, and it’s the subject of this entire series. In this first article, we’ll cover what PX-CSI is, how it fits alongside the rest of the Portworx and Everpure portfolio, what actually runs inside your cluster once it’s deployed, and how to install it end to end.
What is PX-CSI?
PX-CSI (Portworx CSI) is the Everpure CSI driver for Kubernetes. Built on the Kubernetes Container Storage Interface (CSI) specification — the industry-standard API that lets any storage vendor plug into any Kubernetes distribution — PX-CSI connects three Everpure storage platforms directly to Kubernetes clusters:
- FlashArray — block and file storage
- FlashBlade — high-throughput NFS file storage
- Everpure Cloud Dedicated (formerly Cloud Block Store) — the array experience running in the public cloud
In practice, PX-CSI lets a Kubernetes administrator request a PersistentVolumeClaim and get, transparently, a real volume or file system carved out of a FlashArray or FlashBlade — with all the enterprise data services (QoS, encryption, snapshots, synchronous replication) that come with those platforms.
PX-CSI vs. Portworx Enterprise: an important distinction
If you’ve worked with Portworx before, you may know it as Portworx Enterprise: a full software-defined storage (SDS) platform that pools local or attached disks across Kubernetes nodes, replicates data between nodes, and relies on its own key-value store (KVDB) to keep track of cluster state.
PX-CSI is a different, lighter-weight product. It doesn’t pool local disks or replicate data itself — it simply exposes existing FlashArray/FlashBlade capacity to Kubernetes through the CSI standard. Since its 25.8.0 redesign, PX-CSI has dropped the dependency on KVDB entirely: volume and snapshot metadata are stored as native Kubernetes CustomResources (PureVolume, PureSnapshot, StorageNodeInitiator), persisted in etcd like any other Kubernetes object. There’s no separate PX Cluster, PX API, or PX Plugin pod to manage — just a Controller plugin and a Node plugin, which we’ll dig into below.
This matters for anyone evaluating the two products: if your goal is simply to consume FlashArray/FlashBlade storage from Kubernetes with a minimal footprint and a fully Kubernetes-native operational model, PX-CSI is the right layer. If you need advanced services (BC, DR, Security, Automation..), Portworx Enterprise remains the answer.
Why it matters: stateful workloads need real storage
Kubernetes was built for stateless workloads, but the reality in the field is different — databases, message queues, CI/CD artifact stores, ML training data, and now virtual machines (via KubeVirt) all need persistent, performant, and resilient storage. Handing that responsibility to enterprise arrays that already provide QoS, replication, snapshots, and monitoring — rather than reinventing storage as an application-layer concern — is a pattern I see constantly with customers moving toward cloud-native platforms. PX-CSI is how that pattern gets implemented end to end for the Everpure portfolio.
Key capabilities at a glance
Kubernetes-native volume lifecycle — Dynamic and static provisioning through standard StorageClass and PersistentVolumeClaim objects, with support for resize, clone, snapshot, and restore — all through the Kubernetes API, no proprietary CLI required for day-to-day operations.
Multiple storage backends, one driver — FlashArray block volumes, FlashArray File Services (NFS), and FlashBlade file systems are all handled by the same driver and the same pxd.portworx.com provisioner, differentiated only by StorageClass parameters.
High availability with FlashArray ActiveCluster — Volumes can be provisioned on a synchronously replicated, stretched FlashArray pod, giving Kubernetes applications zero-RPO high availability across two arrays.
Topology awareness — CSI Topology lets PX-CSI provision storage on the array closest to the nodes running a given workload, reducing latency and improving fault isolation across zones or regions.
KubeVirt support — Shared ReadWriteMany raw block volumes for VM live migration, and virtual TPM (vTPM) device support via FlashArray File Services.
Built-in observability — Telemetry to Pure1 for proactive support, and native Prometheus metrics for driver health, API latency, and capacity.
We’ll come back to each of these in detail throughout the series. For now, let’s look at what actually runs inside your cluster.
PX-CSI architecture
PX-CSI components run as pods inside the Kubernetes cluster and interact with the Kubernetes API server like any other controller. There are two types of pods:
The Node plugin pod, deployed as a Kubernetes DaemonSet running on every worker node. It handles volume lifecycle operations locally — attaching, mounting, and expanding file systems on the node where a pod actually runs.
The Controller plugin pod, deployed as a Kubernetes Deployment with three replicas for high availability. It handles cluster-wide storage operations: provisioning, expansion, and snapshots.
pureuser@k8s-vla-master:~/portworx$ k get pods -n portworx
NAME                                                  READY   STATUS    RESTARTS   AGE
portworx-operator-58f7d875c5-qfk25                    1/1     Running   0          119s
prometheus-px-prometheus-0                            2/2     Running   0          89s
px-prometheus-operator-676fb4ff6d-xlmjc               1/1     Running   0          93s
px-pure-csi-controller-547db6cb5f-2trzm               7/7     Running   0          95s
px-pure-csi-controller-547db6cb5f-m9sjg               7/7     Running   0          95s
px-pure-csi-controller-547db6cb5f-xff4q               7/7     Running   0          95s
px-pure-csi-node-l977p                                3/3     Running   0          95s
px-pure-csi-node-nkst9                                3/3     Running   0          95s
px-pure-csi-node-vs286                                3/3     Running   0          95s
px-pure-csi-telemetry-hr8qp                           3/3     Running   0          92s
px-pure-csi-telemetry-registration-6d476c8fcf-fvf87   3/3     Running   0          92s
px-pure-csi-telemetry-s52ks                           3/3     Running   0          92s
px-pure-csi-telemetry-zldpl                           3/3     Running   0          92s
Controller plugin pod
The Controller plugin pod implements the CSI Controller API and talks directly to FlashArray and FlashBlade to create, update, and delete volumes. It bundles the standard, community-maintained CSI sidecar containers alongside the PX-CSI controller itself:
csi-provisioner— watches PVC requests and triggers volume creation/deletioncsi-resizer— watches PVC resize requests and calls the controller to expand backend volumescsi-snapshotterandsnapshot-controller— handleVolumeSnapshotcreation, deletion, and consistencycsi-attacher— manages volume attach/detach to nodesliveness-probe— reports controller health back to Kubernetes
The PX-CSI controller plugin itself provisions new volumes on FlashArray and new file systems on FlashBlade, creates/deletes backend hosts as nodes need access, and returns connection details (LUNs, NQNs, or NFS endpoints) to the node plugins. Crucially, it persists all of this as Kubernetes CustomResources (PureVolume, StorageBackend) — replacing KVDB entirely for durable state management.
Node plugin pod
The Node plugin DaemonSet makes provisioned volumes available to application pods on each node. It implements the CSI Node Plugin API for staging, publishing, expanding, and unpublishing volumes: logging into iSCSI or NVMe targets (or connecting to NFS endpoints, depending on the backend), mounting the resulting block device or file system to the pod’s path, expanding file systems on resize, and cleaning up when pods are deleted.
The three CustomResources
This is the piece that most distinguishes the modern PX-CSI architecture:
PureVolumeCR — metadata for every provisioned volume: backend management endpoint, storage device serial ID, device realm and FlashArray pod name, iSCSI/NVMe/FC portals, NFS endpoint, and volume UUID. Created onCreateVolume, deleted onDeleteVolume.PureSnapshotCR — metadata for every provisioned snapshot: backend endpoint, snapshot UUID and name, and FlashArray pod name.StorageNodeInitiatorCR — host-specific metadata needed for volume attachment: iSCSI IQNs, NVMe NQNs, and FC WWNs for each Kubernetes node, populated when the node driver registers with the API server.
All three live in etcd like any Kubernetes object — no external database, no KVDB cluster to size, back up, or troubleshoot separately from Kubernetes itself.
Installing PX-CSI
Prerequisites
Before installing, make sure:
- Your cluster meets the PX-CSI system requirements.
- Your environment is prepared for the backend(s) you plan to use:
- FlashArray as backend storage — multipath configuration, udev rules, FlashArray user access, and the
pure.jsonfile used to create thepx-pure-secret. - FlashBlade as backend storage — user access and the equivalent
pure.jsonentries. - Everpure Cloud Dedicated — same principle, in the cloud.
- FlashArray as backend storage — multipath configuration, udev rules, FlashArray user access, and the
If you plan to use both FlashArray and FlashBlade, complete both preparation guides and merge everything into a single pure.json file before creating the secret.
Step 1 — Generate the pure.json file and create the secret
To allow PX-CSI to communicate with Purity’s API on FlashArray (or FlashBlade), you need to create a user, assign it the storage_admin role, and generate a token that PX-CSI will use.
Both operations can be performed using the WebUI or the CLI on Purity. Below is an example of this procedure using the CLI on FlashArray:
pureuser@baie3> pureadmin create my-px-csi-user --access-policy storage_admin
Enter password:
Retype password:
Name            Type   Access Policy
my-px-csi-user  local  storage_admin

pureuser@baie3> pureadmin create --api-token my-px-csi-user
Name                   Type  API Token                                                        Created                                     Expires
my-px-csi-user  local  56f3f38d-ec8b-e45c-f0a5-xxxxxxxxxxxx 2026-08-07 10:22:57 CEST  -
Grab the API token and generate the following pure.json file:
{
  "FlashArrays": [
    {
      "MgmtEndPoint": "<FA-Admin-ip-address",
      "APIToken": "56f3f38d-ec8b-e45c-f0a5-xxxxxxxxxxxx"
      }
  ]
}
On your Kubernetes cluster, create a namespace called portworx and generate a secret in that namespace from the pure.json file:
pureuser@k8s-vla-master:~/portworx$ k create ns portworx
namespace/portworx created

pureuser@k8s-vla-master:~/portworx$ kubectl create secret generic px-pure-secret --namespace portworx --from-file pure.json
secret/px-pure-secret created
We are now ready to deploy the Operator and the StorageCluster.
Step 2 — Generate the Kubernetes manifest
PX-CSI is deployed via the Portworx Operator, which automates deployment, configuration, and upgrades:
- Log in to Portworx Central.
- Go to Spec List → Create New Spec → PX-CSI.
- Configure the essential details:
- PX-CSI version and Distribution Name (select None for vanilla Kubernetes or Everpure Cloud Dedicated)
- K8s version — grab it quickly with:
- PX-CSI version and Distribution Name (select None for vanilla Kubernetes or Everpure Cloud Dedicated)
(kubectl version --short 2>&1 || kubectl version) | awk -Fv '/Server Version: / {print $3}'- Namespace, Cluster Name Prefix
- Access Type — Block Storage (FlashArray block), File Storage (FlashArray File Services/FlashBlade), or Both
- Storage Area Network Type — iSCSI by default, when using block access
- Telemetry and Install Prometheus — both worth enabling; we’ll cover them in the observability article later in this series
- Optionally configure advanced settings (custom registry, multiple iSCSI interfaces via
PURE_ISCSI_ALLOWED_IFACES, subnet-aware iSCSI login, restricted RBAC permissions). - Click Save and Download.
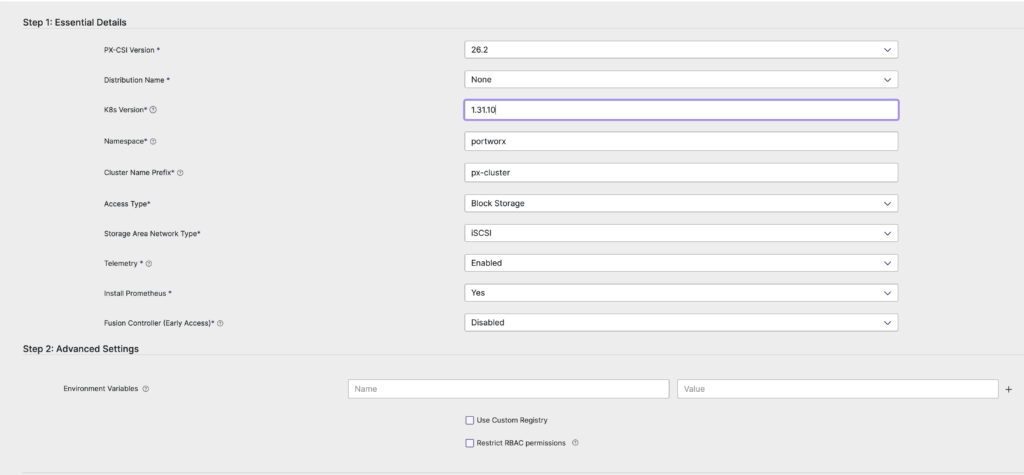
If you already know you’ll want CSI Topology (covered later in this series), enable it now in the generated spec:
csi:
  enabled: true
  topology:
    enabled: true
Step 3 — Deploy the Operator and the StorageCluster
Apply the Operator manifest on your cluster:
pureuser@k8s-vla-master:~/portworx$ kubectl apply -f 'https://install.portworx.com/26.2?comp=pxoperator&oem=px-csi&kbver=1.31.10&ns=portworx&promop=true'
Warning: resource namespaces/portworx is missing the kubectl.kubernetes.io/last-applied-configuration annotation which is required by kubectl apply. kubectl apply should only be used on resources created declaratively by either kubectl create --save-config or kubectl apply. The missing annotation will be patched automatically.
namespace/portworx configured
serviceaccount/portworx-operator created
clusterrole.rbac.authorization.k8s.io/portworx-operator unchanged
clusterrolebinding.rbac.authorization.k8s.io/portworx-operator unchanged
deployment.apps/portworx-operator created
Apply the StorageCluster manifest on your cluster:
pureuser@k8s-vla-master:~/portworx$ kubectl apply -f 'https://install.portworx.com/26.2?oem=px-csi&operator=true&ce=pure&csi=true&stork=false&mon=true&promop=true&kbver=1.31.10&ns=portworx&c=px-cluster-fab2af5f-2ec4-4306-ac99-d2a00d377bc3&pureSanType=ISCSI&tel=true'
storagecluster.core.libopenstorage.org/px-cluster-fab2af5f-2ec4-4306-ac99-d2a00d377bc3 created
Step 4 — Verify the installation
pureuser@k8s-vla-master:~/portworx$ kubectl get pods -n portworx
NAME                                                  READY   STATUS    RESTARTS   AGE
portworx-operator-58f7d875c5-8vvg8                    1/1     Running   0          4m27s
prometheus-px-prometheus-0                            2/2     Running   0          2m27s
px-prometheus-operator-676fb4ff6d-jnmx9               1/1     Running   0          2m29s
px-pure-csi-controller-547db6cb5f-bkz74               7/7     Running   0          2m31s
px-pure-csi-controller-547db6cb5f-glkvw               7/7     Running   0          2m31s
px-pure-csi-controller-547db6cb5f-zjdws               7/7     Running   0          2m31s
px-pure-csi-node-9g8l4                                3/3     Running   0          2m31s
px-pure-csi-node-mrwkc                                3/3     Running   0          2m31s
px-pure-csi-node-ztcnx                                3/3     Running   0          2m31s
px-pure-csi-telemetry-2crgp                           3/3     Running   0          2m28s
px-pure-csi-telemetry-cqp24                           3/3     Running   0          2m28s
px-pure-csi-telemetry-k55x6                           3/3     Running   0          2m28s
px-pure-csi-telemetry-registration-6d476c8fcf-rgz7l   3/3     Running   0          2m28s

pureuser@k8s-vla-master:~/portworx$ kubectl get stc -n portworx
NAME                                              CLUSTER UUID                           STATUS    VERSION   AGE
px-cluster-fab2af5f-2ec4-4306-ac99-d2a00d377bc3   fbc57b0c-b000-49c4-9b8a-045a430b0c54   Running   26.2.0    3m57s
You should see the Controller plugin Deployment (3 replicas) and the Node plugin DaemonSet (one pod per worker node) reporting Running, and the StorageCluster object reporting a healthy status.
PX-CSI also deploys a set of default StorageClasses automatically — check them with:
pureuser@k8s-vla-master:~/portworx$ kubectl get sc
NAME                        PROVISIONER        RECLAIMPOLICY   VOLUMEBINDINGMODE   ALLOWVOLUMEEXPANSION   AGE
px-fa-direct-access         pxd.portworx.com   Delete          Immediate           true                   4m46s
px-fb-direct-access-nfsv3   pxd.portworx.com   Delete          Immediate           true                   4m46s
px-fb-direct-access-nfsv4   pxd.portworx.com   Delete          Immediate           true                   4m46s
We’ll use (and customize) those StorageClasses in the next article.
Here is a quick demo of walking through installation of PX-CSI on a Kubernetes cluster
What’s next
With PX-CSI installed and its pods healthy, the next article covers provisioning: how StorageClass parameters map to FlashArray block volumes, FlashArray File Services, and FlashBlade file systems, and how dynamic and static provisioning actually work end to end, from PVC creation to a mounted volume inside your pod.
This article is part of a series on PX-CSI. Next: PX-CSI – Provisioning Storage.