
This is the third article in my series about running Vates XCP-NG with Everpure platforms. If you’re new to XCP-NG, I recommend starting with the Quick Introduction to get familiar with the platform before diving in.
Introduction
In this article, we’re getting hands-on. We’ll walk through the architecture design for running XCP-NG with Everpure FlashArray over iSCSI — from the lab environment and network topology to FlashArray preparation and Storage Repository configuration over iSCSI..
The lab setup described here uses iSCSI connectivity, but everything discussed in this article applies equally to Fibre Channel environments. The architecture principles, best practices, and ActiveCluster behavior remain the same regardless of the transport protocol.
Let’s start with a look at the lab environment.
Lab environment
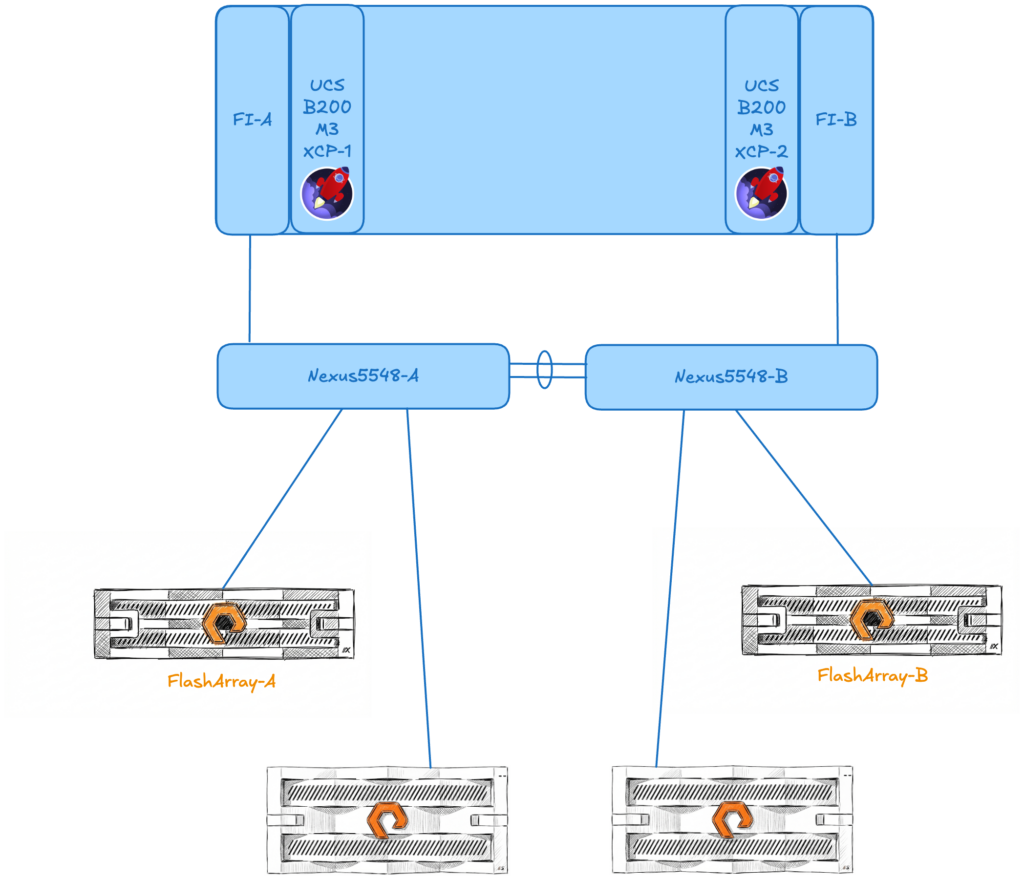
The following components are used throughout this series. While this is a lab setup, the architecture mirrors what you would typically find in a production environment — two compute nodes, redundant network paths, and a pair of FlashArrays.
Compute
| Component | Details |
| Servers | 2x Cisco UCS B200 M3 |
| Processors | 2x Intel Xeon E5-2640 v2 per server |
| Memory | 256 GB RAM per server |
| Network uplink | Fabric Interconnect to Nexus 5548 – 10Gbps |
Storage
| Component | Details |
| Block storage platform | 2x Everpure FlashArray //X50-R2 |
| Block storage software | Purity//FA 6.7.6 |
| File & Object storage platform | 2x Everpure FlashBlade //S100 |
| File & Object storage software | Purity//FB 4.6.7 |
Virtualization
| Component | Details |
| Hypervisor | XCP-NG 8.3.0 |
| Management | Xen Orchestra Appliance (XOA) 6.1.2 |
Network Overview
In this lab environment, all traffic — host management, iSCSI storage, and VM guest network — shares a single VLAN and a common set of 10 Gbps uplinks through the Fabric Interconnects. This is a simplified setup to keep the lab straightforward and focus on the storage integration itself.
⚠️ Production recommendation: In a production environment, you would want to segregate traffic types using dedicated VLANs:
- Management VLAN — XCP-NG host management and Xen Orchestra access
- iSCSI-A / iSCSI-B VLANs — Dedicated and separate storage paths to FlashArray, each on its own VLAN to ensure multipath redundancy
- VM traffic VLAN(s) — Guest network traffic, potentially with multiple VLANs depending on tenant or application segmentation
Storage network isolation is critical in production for both performance and reliability. By placing each iSCSI path on its own VLAN and mapping it to a dedicated interface, you ensure that a single network failure never takes out both storage paths simultaneously. It also prevents VM traffic bursts from impacting storage latency — which is especially important for latency-sensitive workloads.
A detailed network diagram is provided below to illustrate the lab topology.
A note on the hardware
You might notice that the Cisco UCS B200 M3 servers are a few generations old — and you’d be right. This is a lab environment, and the beauty of XCP-NG is that it runs efficiently on modest hardware. The architecture, configuration steps, and Everpure platforms integration covered in this series are fully applicable to current-generation servers. The focus here is on the design and the workflow, not on raw performance benchmarks.
Before we start configuring storage, we need to prepare the foundation: a single XCP-NG pool with both servers, and a running instance of Xen Orchestra to manage everything going forward
Creating and joining the pool
When you install XCP-NG on a bare-metal server, it automatically creates its own pool as a standalone member. In our case, we have two servers that need to work together as a single resource pool.
The first step is to rename the default pool on server 1 to give it a meaningful name, and then join server 2 to this pool. Once joined, both hosts will share access to the same Storage Repositories and allow VM live migration between them.
All these steps are performed through the server console using the xe CLI commands and the xsconsole, as shown in the following video :
Deploying the Xen Orchestra Appliance
With our pool ready, the next step is to deploy the Xen Orchestra Appliance (XOA). The quickest way to do this is directly from the XO Lite interface. In just a few clicks, XO Lite downloads and deploys the XOA virtual appliance onto the pool.
Once deployed, XOA becomes our central management interface for all subsequent operations — from storage configuration to VM management and backup.
The deployment process is shown in the following video (I just removed upgrades and registration from this video to make it short).
Now we can proceed with storage operations
Configuring iSCSI connectivity between XCP-NG and FlashArray
Now that our XCP-NG pool is up and running with Xen Orchestra managing it, it’s time to connect it to our Everpure FlashArray. In this section, we’ll walk through the end-to-end process: preparing the FlashArray, configuring the XCP-NG hosts, and creating our first shared Storage Repository.
Configuring a dedicated storage network
In a production environment, storage traffic should always be isolated from management and VM traffic. This means creating dedicated networks for iSCSI connectivity — ideally two separate VLANs, one per storage path, to ensure full multipath redundancy.
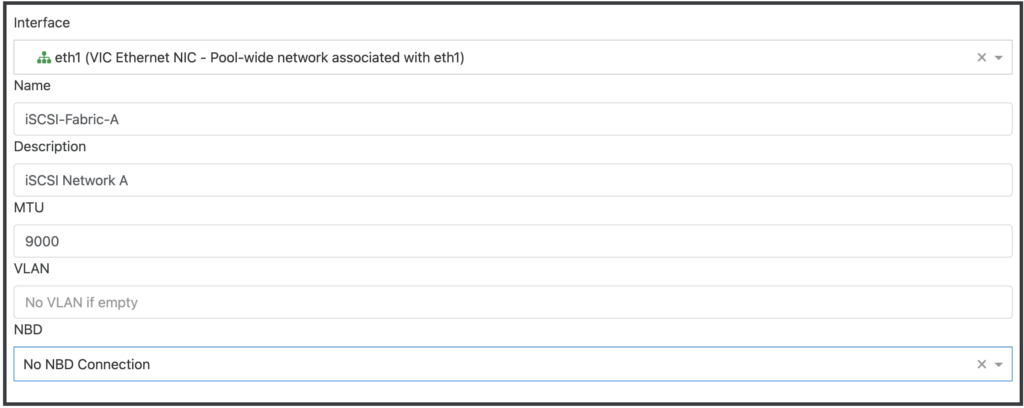
In Xen Orchestra, creating a dedicated storage network is straightforward. Navigate to New → Network and configure the following:
- Interface: Select the physical NIC or bond that will carry iSCSI traffic
- Name: Your network name (e.g., iSCSI-Fabric-A)
- Description: Optional
- MTU: 9000 if using Jumbo Frame (⚠️ be very careful when using Jumbo Frame with routed VLANs)
- VLAN: Assign the appropriate VLAN ID for your storage network if you want to use VLANs
- NBD: Leave the default “No NBD Connection” (we will talk about this later in a different post)
Repeat this for your second iSCSI path (e.g., iSCSI-Fabric-B).
Once the networks are created, you’ll need to assign an IP address to the corresponding PIF (Physical Interface) on each host. This can be done from Home → Hosts → [your host] → Network in Xen Orchestra.
Click on the “Mode” field and set it to Static, XO will ask for IP information to configure on this PIF.
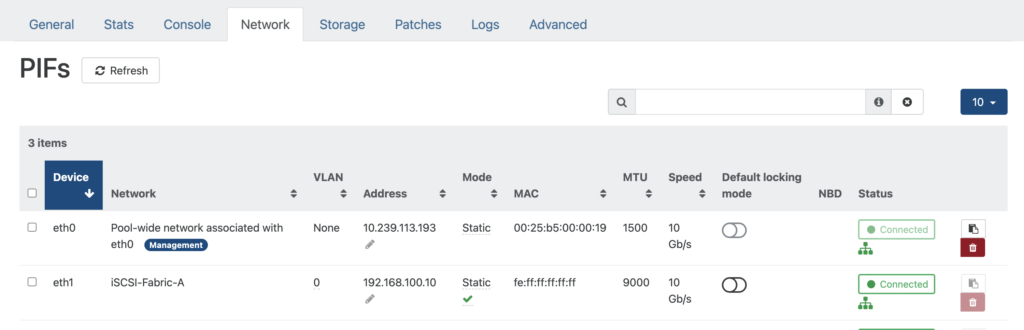
Make sure each host has an IP address on each iSCSI network, and that these IPs can reach the FlashArray iSCSI target ports.
⚠️ Note: In this lab, all traffic shares a single VLAN and network, so this dedicated network configuration is not applied. However, I strongly recommend implementing this separation in any production deployment for both performance and reliability reasons.
🎉 Good news: XCP-NG is already Everpure-friendly!
If you’re used to deploying Everpure FlashArray with Linux hosts, you know that best practice typically involves configuring specific multipath settings in /etc/multipath.conf and adding custom udev rules in /etc/udev/rules.d/99-pure-storage.rules to ensure optimal path management and device handling.
With XCP-NG, you can skip this step entirely. The recommended Everpure multipath parameters and udev rules for Xen-based hosts are already present out of the box in XCP-NG. No manual tuning is required — the hypervisor ships with a configuration that is fully aligned with Everpure best practices.
Enabling multipathing on XCP-NG
Before creating the Storage Repository, make sure multipathing is enabled on your XCP-NG hosts. Multipathing allows the host to use multiple network paths to reach the same LUN on the FlashArray, providing both redundancy and load balancing.
Multipathing can be enabled from Xen Orchestra under Home → Hosts → [your host] → Advanced → Multipathing
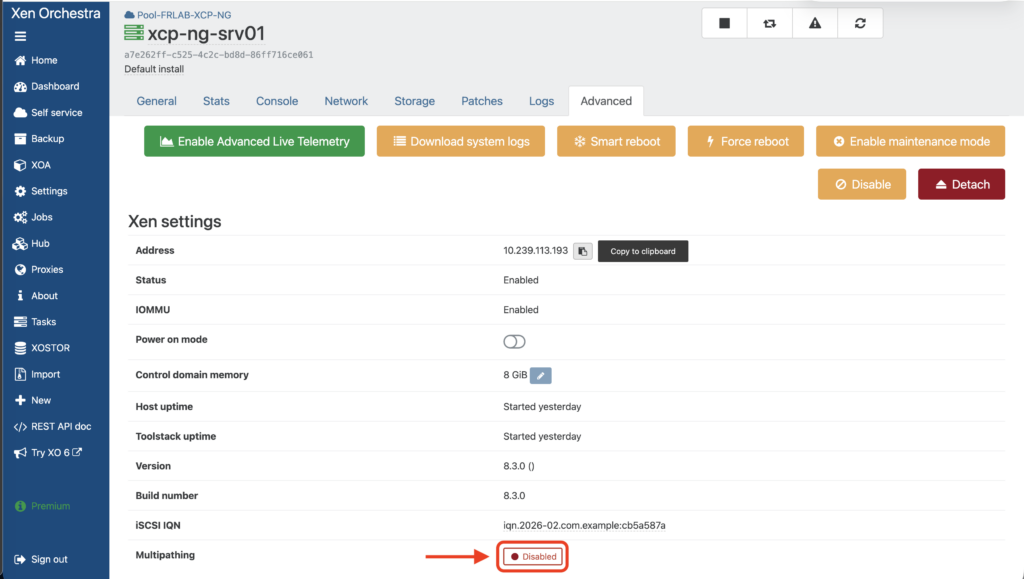
Click on the Disabled toggle to enable it (if multipathing is not already enabled).
⚠️ You can’t enable multipathing if VMs are running on the host so migrate all VMs to the other host before proceeding.
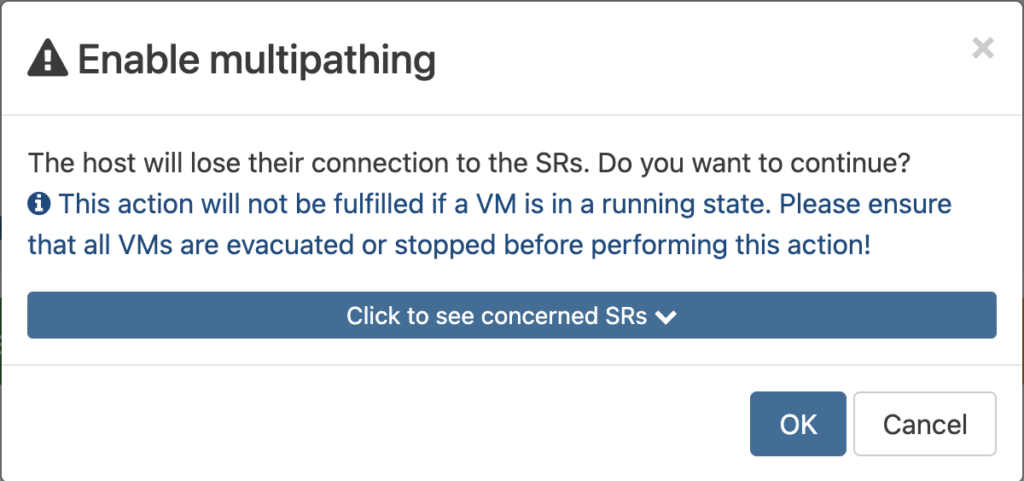
Repeat this for each host in the pool. A host reboot may be required for the change to take effect.
Last thing before moving to FlashArray configuration : Retrieve the IQN for each server
Each IQN can be retrieved under Home → Hosts → [your host] → Advanced → iSCSI IQN
Preparing the FlashArray
Before creating the Storage Repository on the XCP-NG side, we need to set up a few things on the FlashArray. All operations below are performed from the Everpure GUI (Purity//FA).
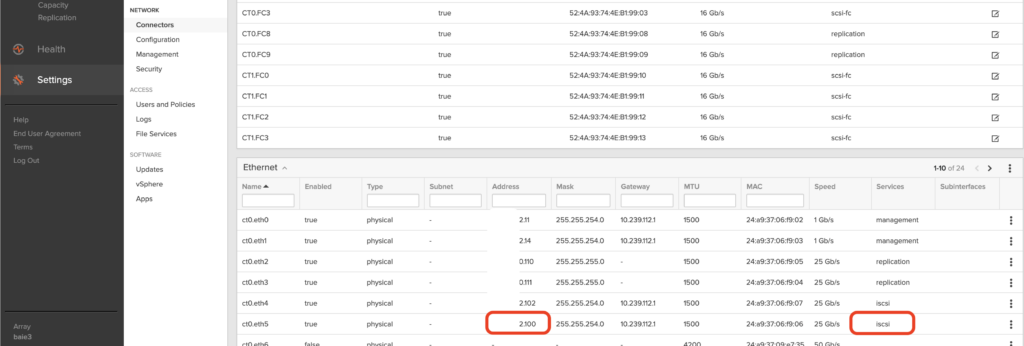
Retrieve the iSCSI target ports
First, note one of the iSCSI target IP addresses of your FlashArray. These are the iSCSI interfaces configured on the array that your hosts will connect to. You can find them under Settings → Network → Connectors in the FlashArray GUI.
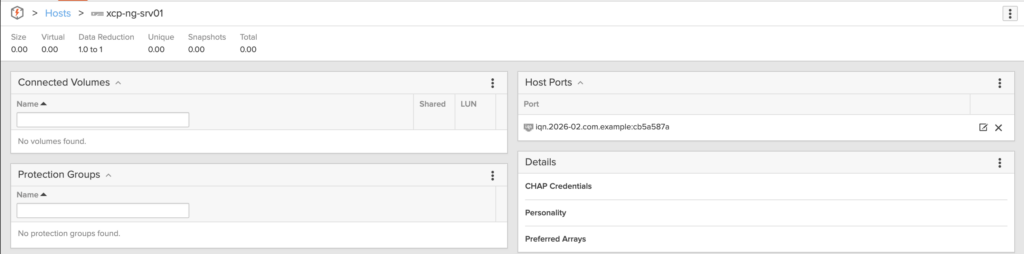
Create a Host entry for each XCP-NG server
On the FlashArray, each server that connects to the array needs to be registered as a Host.
After creating the host, add the iSCSI IQN of each XCP-NG server as the Host Ports
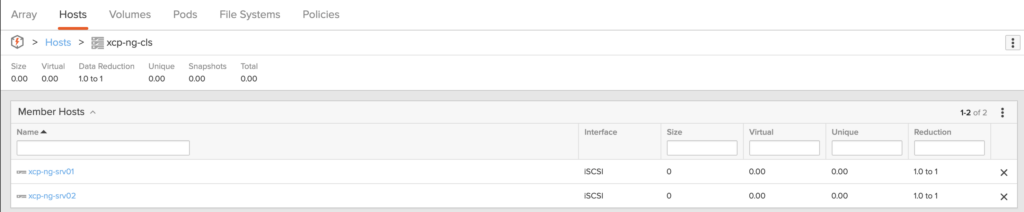
Create a Host Group
Once both hosts are created, group them into a Host Group. A Host Group allows you to present the same volumes to multiple hosts simultaneously — which is exactly what we need for a shared Storage Repository accessible by all pool members.
Create a Volume and connect it to the Host Group
Now, create a Volume on the FlashArray. This volume will become the backing LUN for our XCP-NG Storage Repository. Size it according to your needs — for this lab, we provision a volume of 1TB (remember, everything is thin-provisioned with Everpure).
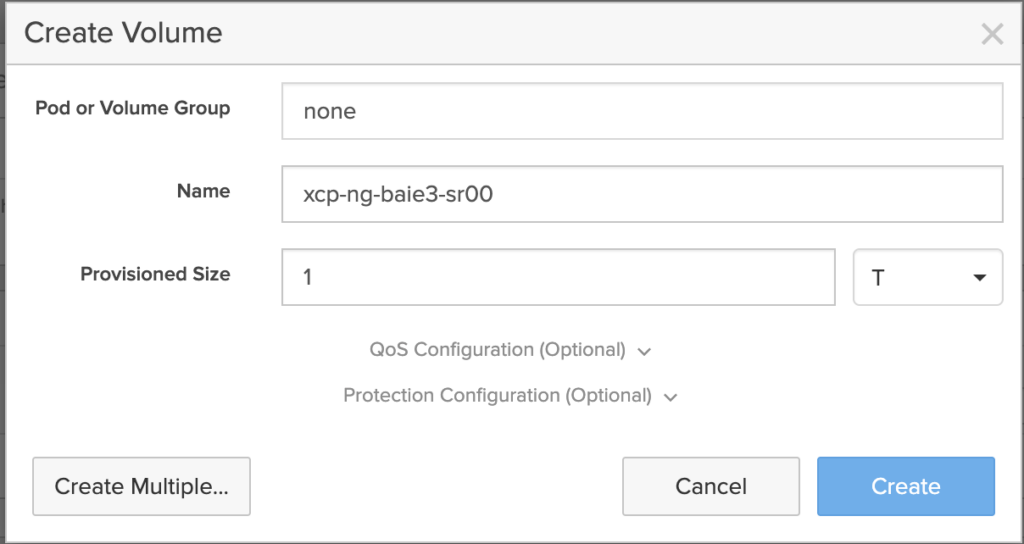
Once created, connect the volume to the Host Group. This makes the LUN visible to both XCP-NG servers simultaneously.

At this point, the FlashArray side is ready. Both XCP-NG hosts can now discover and access the iSCSI LUN.
Creating the iSCSI Storage Repository
Everything is now in place to create our shared Storage Repository. This is done from Xen Orchestra.
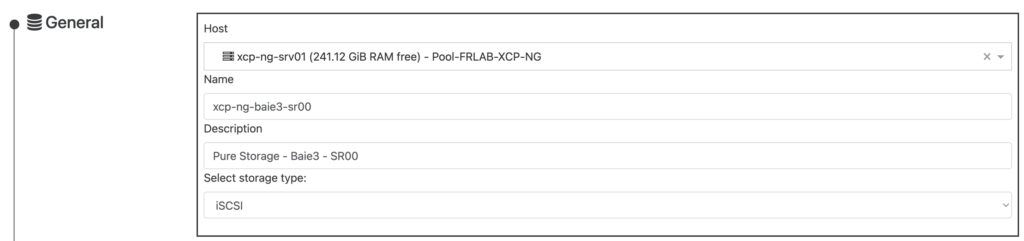
Navigate to New → Storage and select iSCSI as the storage type. Fill in the following:
- General
- Host: Select one host of the Pool (here we selected xcp-ng-srv01)
- Name: Enter the Storage Repository name (xcp-ng-baie3-sr00 – try to use the same name as the volume’s name on the FlashArray)
- Description: Enter your own description for this Storage Repository
- Storage type: Select iSCSI
- Settings
- Enter the iSCSI Target IP address you retrieved in the previous step (leave the [port] field blank) and click on the search icon so the host will scan
- Select the first target (iqn.2010-06.com.purestorage:flasharray.xxxxxxxxxx)

You will see a list of LUNs available from this target (here we only have 1 LUN available, but in case you provision several volumes, pick the one you want to use for this Storage Repository)
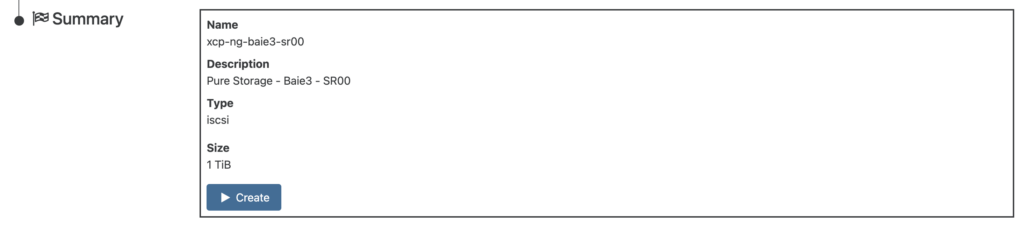
Review the Summary and click on Create:
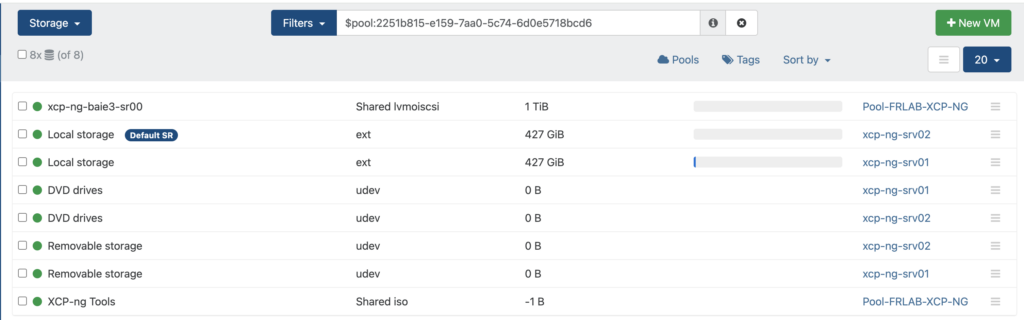
Once the operation is completed, the Storage Repository is available for every host in the Pool. You can see it the Storage section on Xen Orchestra:
Verifying connectivity and paths
Once the SR is created, take a moment to verify that everything is connected properly:
On the FlashArray GUI, navigate to Health section and confirm that both hosts have Redundant path for each controller

In Xen Orchestra, check that the SR shows as Connected on both hosts
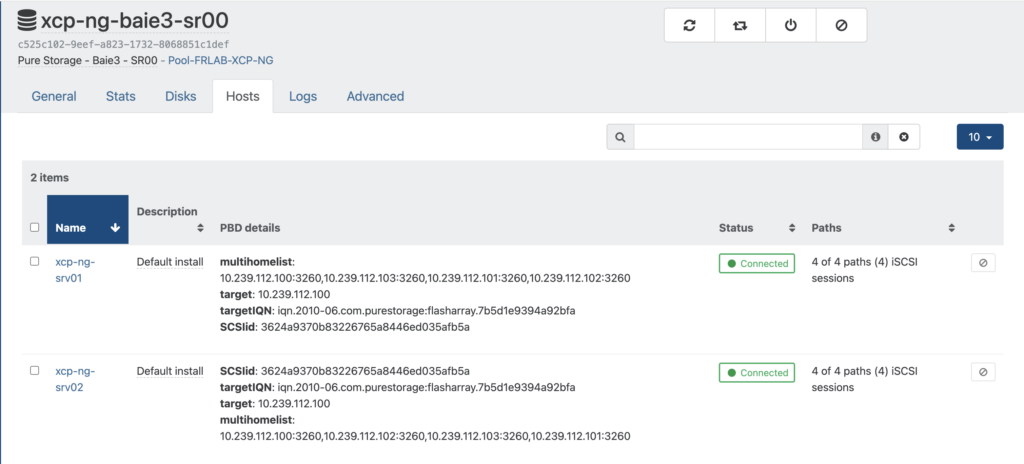
Verify that multipath is active and showing multiple paths to the LUN
[11:05 xcp-ng-srv01 ~]# multipath -ll
3624a9370b83226765a8446ed035afb5a dm-1 PURE    ,FlashArray
size=1.0T features='0' hwhandler='1 alua' wp=rw
`-+- policy='queue-length 0' prio=50 status=active
  |- 1:0:0:254 sdb 8:16 active ready running
  |- 2:0:0:254 sdc 8:32 active ready running
  |- 3:0:0:254 sdd 8:48 active ready running
  `- 4:0:0:254 sde 8:64 active ready running
At this point, you have a fully functional shared iSCSI Storage Repository backed by a Everpure FlashArray, accessible from both XCP-NG hosts in your pool. You can now create virtual machines on this SR and live migrate them between hosts.
What’s next
At this point, you have a fully functional shared iSCSI Storage Repository backed by a Everpure FlashArray, accessible from both XCP-NG hosts in your pool. You can now create virtual machines on this SR, live migrate them between hosts, and take full advantage of the FlashArray’s performance and data services.
But what happens if the FlashArray itself becomes unavailable? How do you ensure continuous access to your VMs in the event of a complete array failure or a site-level outage?
In the next article, we’ll answer these questions by introducing Everpure ActiveCluster — a synchronous replication technology that provides transparent, metro-stretch high availability across two FlashArrays. We’ll walk through the architecture, configure ActiveCluster with our XCP-NG pool, and most importantly, put it to the test with real failover scenarios captured on video. If you’re designing a production environment where downtime is not an option, you won’t want to miss it.
Stay tuned!
This article is part of a series on Vates XCP-NG and Everpure integration. You can find all articles here: Virtualization – XCP-NG / Vates